How to create a Notion client portal: Ultimate guide for 2026
Create a client portal for Notion
Try Assembly to create and manage your own client portal - free for 14 days, no credit card needed.
4.9 rating
A Notion client portal is a shared workspace where you give clients access to tasks, files, and updates. I’ve used the platform in past projects and tested this setup directly, so I’ll show you how to build it using Notion’s databases and permissions in 2026.
Can you build a client portal in Notion?
Yes, you can build a client portal in Notion using databases, guest access, and granular page-level permissions.
Notion lets you invite clients as guests and assign view, comment, or edit access to specific pages. On the Business and Enterprise plans, you can also limit access to individual database pages, which helps you keep each client's tasks, files, and updates separate inside a shared database.
I’ve seen teams combine filtered views and page-level permissions to give clients access to only their own work. Overall, it’s doable, but it requires careful setup and testing.
Important: What you’re building is still a shared workspace inside Notion. Clients log in through Notion, and permissions can inherit from parent pages if you’re not careful. It isn’t a standalone, branded client system with its own authentication or account layer.
What you need before starting
Before you build a Notion client portal, you’ll want to make sure you have the right plan, a clear structure, and a realistic idea of how long setup will take.
Here’s what you’ll need:
- Business or Enterprise plan: You’ll need one of these plans if you want page-level database permissions.
- A clear client structure: Decide whether you’ll use one master database with filtered views or duplicate pages for each client.
- Basic database knowledge: You should understand how to create properties, filters, and linked database views.
- A separate test account: Create a free guest account so you can test exactly what your clients will see.
I tested building client portals in Notion and found that the initial setup can take anywhere from 1 to 3 hours, depending on how complex your workspace is. Ongoing maintenance can take additional time as you add clients and update permissions.
How to create a Notion client portal in 6 steps
Creating a Notion client portal means building a central database, limiting what each client can see, and testing permissions before sharing access.
Here are 6 steps to build one:
Step 1: Plan how client data will be organized
Decide whether you’ll keep all client records in one database that you create, or if you’ll build separate pages for each client.
In most cases, creating one central database for all clients is easier to manage. You can then filter that database so each client only sees their own records instead of duplicating pages every time you add someone new.
Write down exactly what clients should see in their portal, such as:
- Their tasks
- Their files
- Project updates
- Key deadlines
Tip: Be clear about what belongs in the client portal before you build it. Adjusting the structure later often means rechecking every permission.
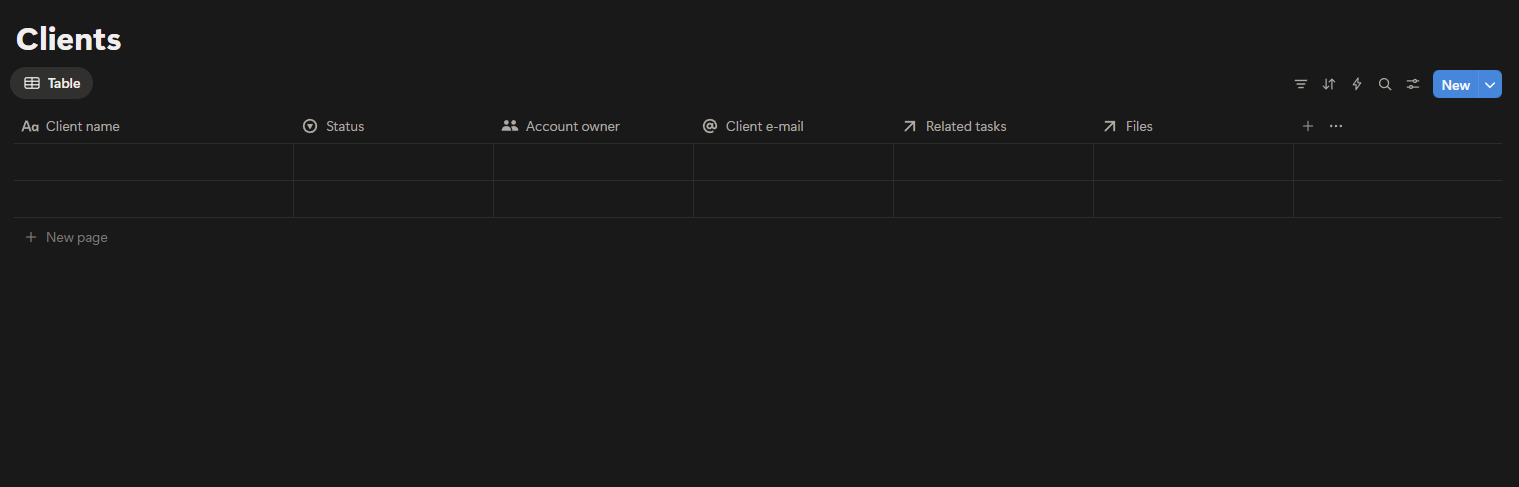
Step 2: Create a central Clients database
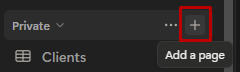
In your main Notion workspace, click the + in the sidebar to create a new page.
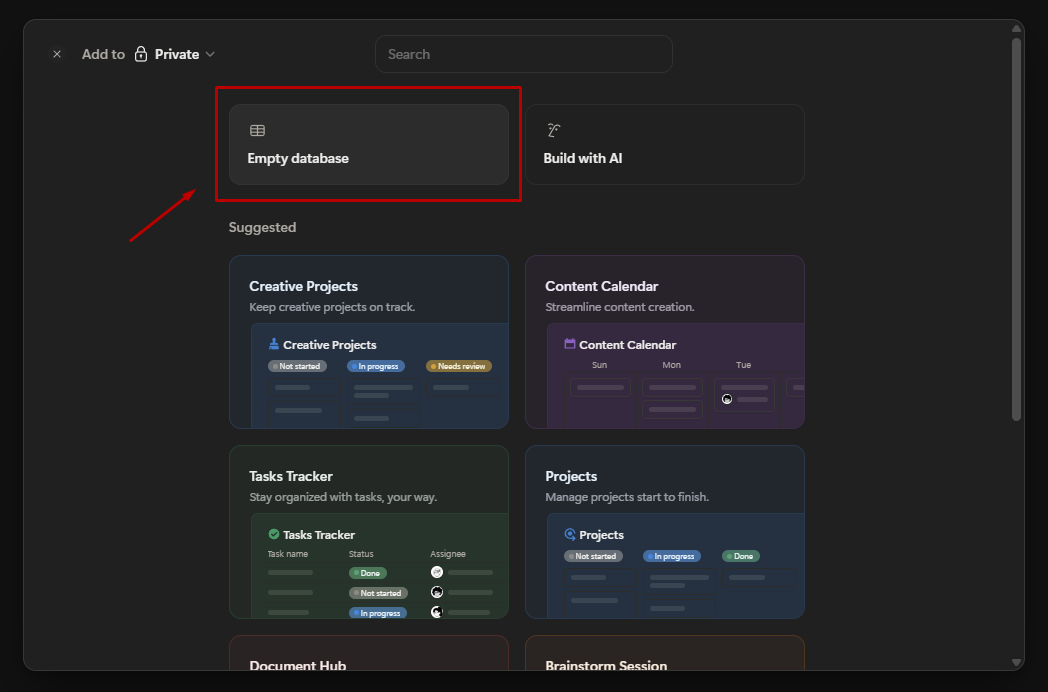
On the new page, click on Database on the bottom toolbar. Then, click Empty database.
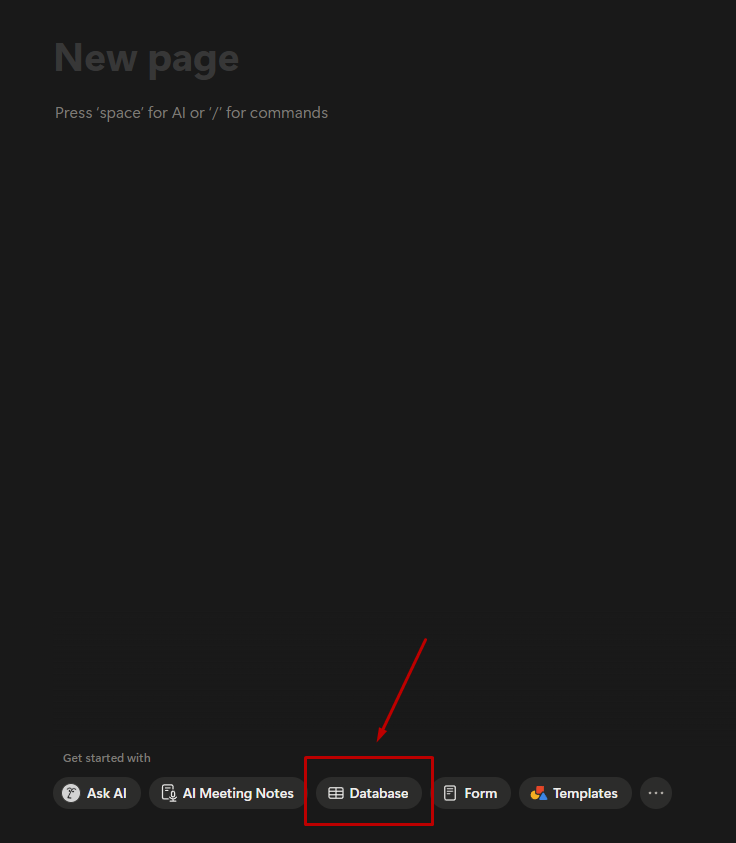
This creates a database that will store one row per client. Each row also functions as a page, and that page becomes the client’s portal.
Now add the properties you’ll need. Click the + icon to the right of your existing columns to create a new property. Repeat this step for each property below:
- Status: Set the property type to Select so you can track stages like Active, On hold, or Completed.
- Account owner: Set the property type to Person so you can assign a team member.
- Client email: Set the property type to Email.
- Related tasks: Set the property type to Relation and link it to your Tasks database. If you haven’t created a Tasks database yet, create one before setting up this relation.
- Related files: Set the property type to Relation and link it to your Files database. Similarly, create this database first if it doesn’t already exist.
Tip: I recommend keeping property names simple because clear labels make filters easier to configure later on.
Step 3: Add filtered views for each client
Adding filters will let you see each client’s information.
Open your Clients database and click on a client’s name. Since each row in the database is also a page, doing this opens that client’s portal.
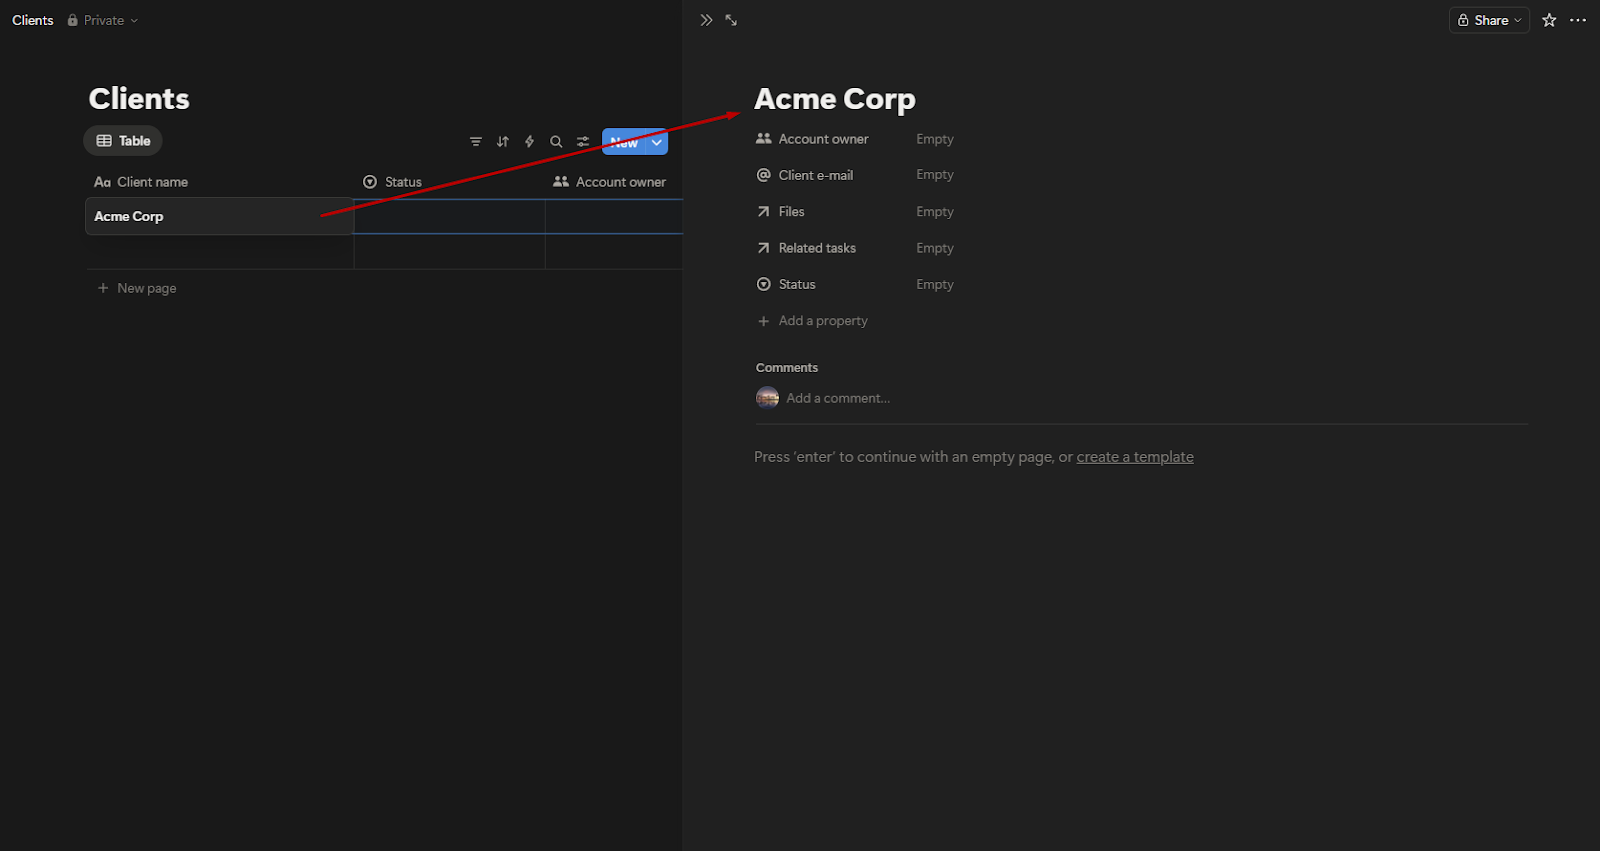
Inside the page, type /linked and select Create linked view of database. Choose your Tasks database.
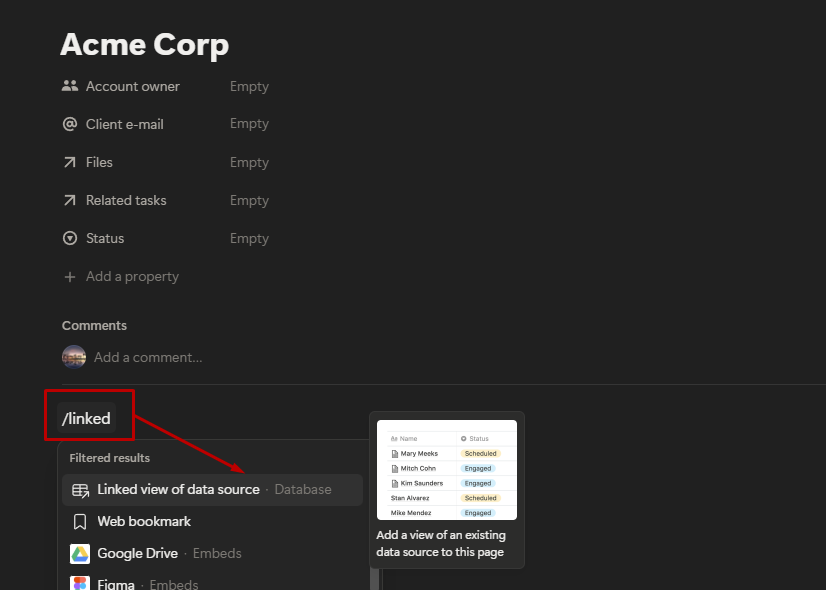
Click on the filter icon (three horizontal lines) to add a filter. Select the Clients relation property and choose the current client page.
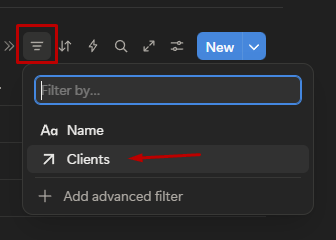
Because this is a Relation property, you’re filtering by linked records, not text. The view will now display only tasks connected to that client.
Repeat the same process for your Files database so only files related to that client appear.
Important: To prevent one client from seeing another client’s records, you’ll need a Business or Enterprise plan with database page-level access enabled. Once configured in the database’s sharing settings, these rules apply automatically across all views and linked views, providing real record-level restrictions instead of relying only on filters.
Step 4: Set up guest access and check page hierarchy
Once the client’s page is set up with filtered views, you’re ready to share it. Open the client’s page and click Share in the top-right corner.

Enter the client’s email address. From the dropdown, choose the appropriate permission level:
- Can view if clients only need to see updates
- Can comment if you want them to leave feedback
- Can edit only if you want them modifying content
Avoid giving full access unless there’s a clear reason. Full access allows sharing and permission changes.
Important: Before clicking Invite, confirm you’re sharing only the client’s page and not a parent page. Notion permissions inherit downward, so sharing a higher-level page can expose more than intended.
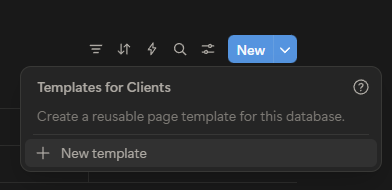
Step 5: Create a reusable client portal template
Once your first client page is set up correctly, turn that structure into a template so you don’t have to rebuild it every time.
Next to the New button, click the dropdown arrow and select New template. Name it “Client Portal.”
Inside this page, recreate the layout you built for your first client.
Type /linked and choose Create linked view of database. Select your Tasks database.
Click Filter, then Add filter.
Select the Clients relation property. In the value field, choose the Client Portal page itself. When you create a new client using this template, Notion automatically updates that reference to the new client’s page.
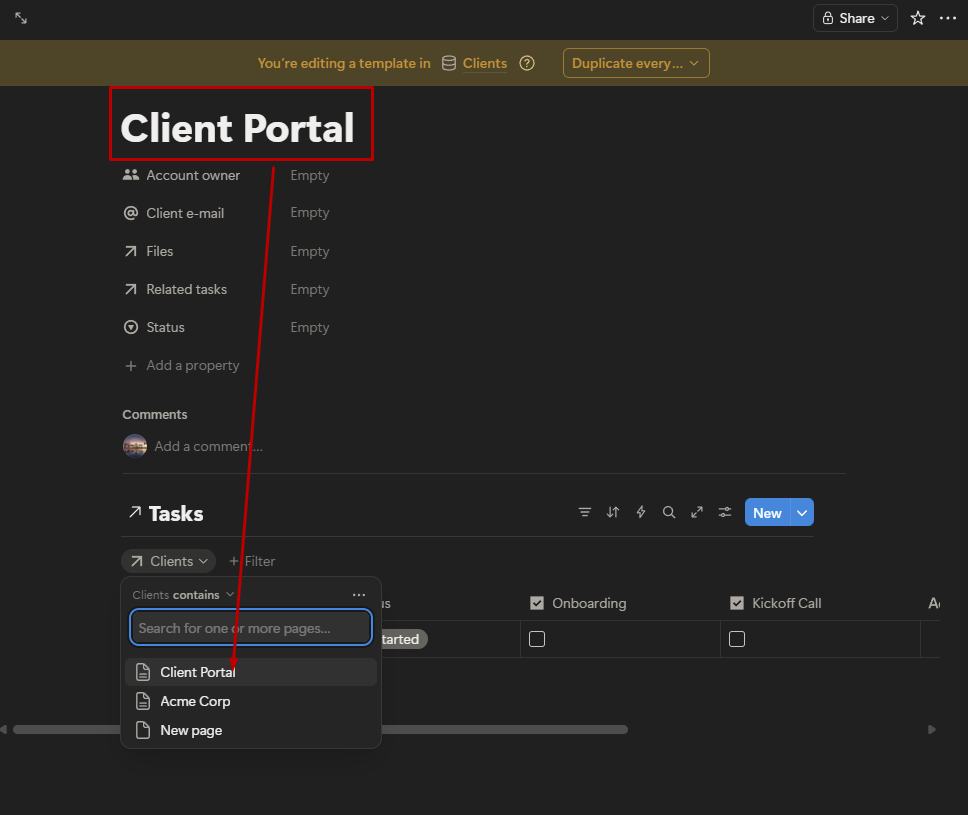
Then, repeat the same steps for your Files database so the linked view is also filtered by the Clients relation.
You can also add:
- A short welcome message
- A project overview section
- A timeline or updates area
Now, when you click New and select the “Client Portal” template, Notion generates a ready-made portal page with the correct filtered views already in place.
Tip: Test the template once before rolling it out to real clients. It’s easier to adjust the template now than to update multiple client pages later.
Step 6: Test with a separate client account
Before inviting real clients, create a separate guest account using a different email address. Share your portal with that account.
Log in as that user and move through the portal the way a client would. Open tasks, click into files, and try navigating to related pages. Confirm that only that client’s records are visible, other client names do not appear anywhere, and internal notes and admin-only databases remain hidden.
Testing this way shows you exactly what your client will see. In my experience, permission issues usually appear during this review, not while you’re building the structure.
Common mistakes to avoid
Even when your setup looks correct, small configuration details can cause problems later. Watch for these common mistakes when building a Notion client portal:
- Overexposing database views: Don’t rely on filters alone; check your sharing settings as well. If you’ve shared a broader page or database, clients may still access related records.
- Duplicating pages without updating filters: If you duplicate a client page manually, update every linked view to point to the correct client. A single outdated filter can expose the wrong data.
- Relying only on templates: Use templates for structure, but configure relations, filters, and sharing settings yourself. Templates don’t secure your data automatically.
- Forgetting the client experience: Review the portal from the client’s perspective. Remove internal labels, simplify navigation, and keep only what they need.
- Not planning for offboarding: Decide how you’ll handle access when a project ends. Remove guest access, archive the page, or switch it to read-only based on your process.
Should you use Notion client portal templates?
Yes, you can use Notion client portal templates, but they only help with layout.
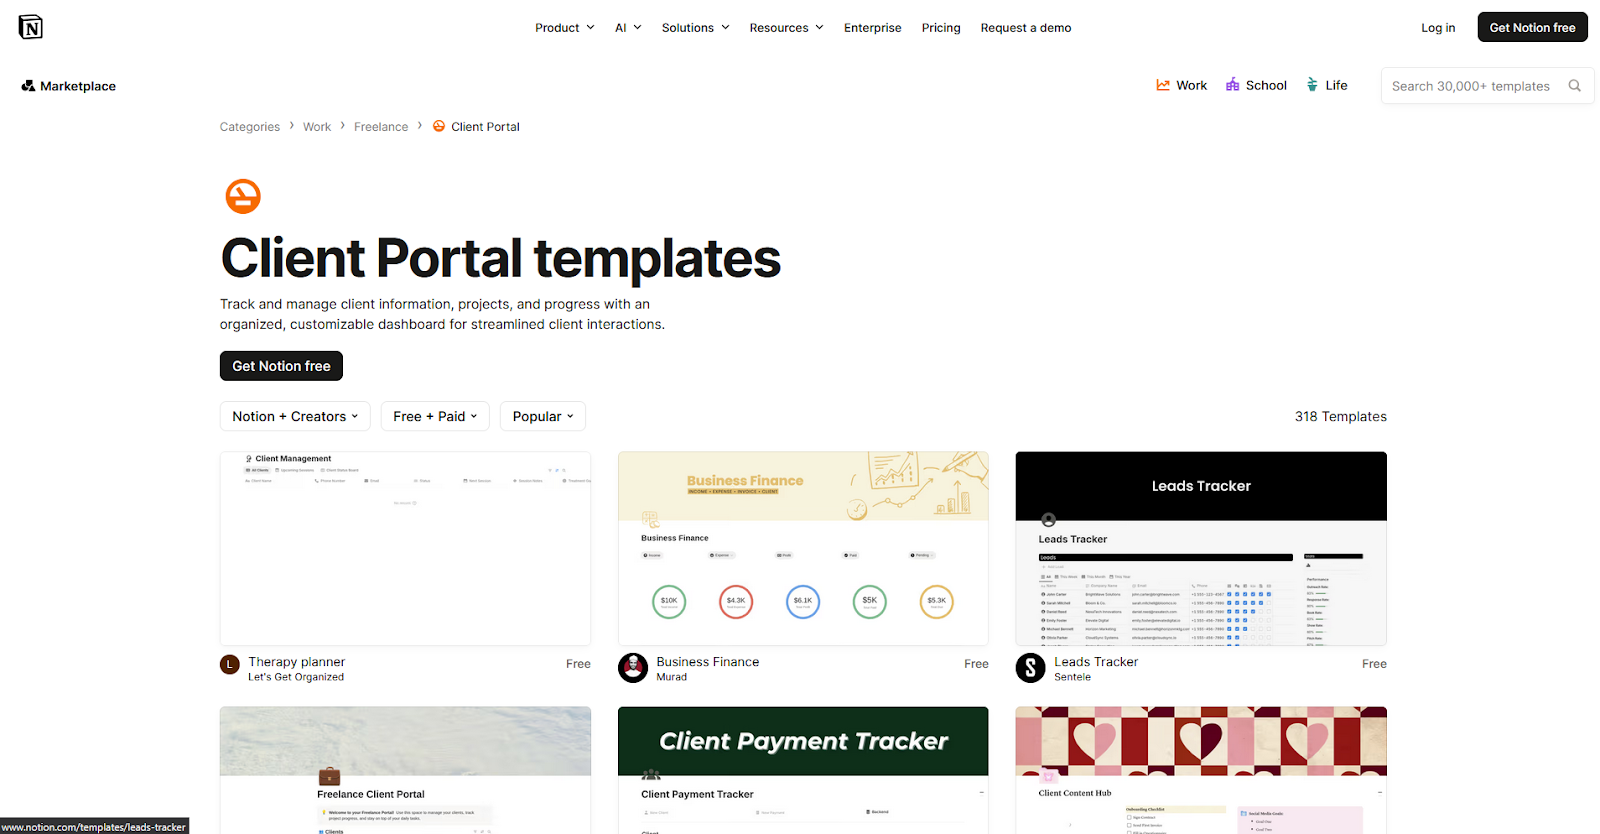
Notion’s official template gallery includes hundreds of client portal designs you can start from. You can also find community-built versions online. These templates can save time when setting up sections like tasks, files, and updates.
However, templates do not configure your relations, filters, or sharing settings automatically. You’ll still need to connect your databases properly and verify permissions before inviting clients.
Limitations of Notion client portals
Notion can support a client portal setup, but there are practical limitations to consider as your needs grow. Here are areas where teams often need additional tools:
- Branding: Notion pages follow Notion’s interface and layout structure. You can add logos and cover images, but full white-label control and custom domains require additional tools.
- Client login experience: Clients access the portal through a Notion account. The experience feels like entering a shared workspace rather than a branded client dashboard.
- Billing and subscriptions: Notion doesn’t include built-in tools for invoicing, recurring payments, or subscription management. You can embed or link to third-party platforms like Stripe or PayPal, but billing isn’t managed directly inside Notion.
- Contracts: Notion can store contract documents, but it doesn’t include built-in contract workflows, e-signature management, or approval tracking.
- Messaging: Comments and mentions work well for internal collaboration, but Notion isn’t designed as a dedicated client communication hub.
- Multi-client scalability: As you add more clients, managing filters, sharing settings, and page hierarchy requires more oversight. Maintenance time increases with each additional portal.
How Assembly can extend your Notion client portal
If you’ve built a Notion client portal for internal coordination, Assembly can add a branded client-facing layer without disrupting how your team works.
Assembly is a client portal platform built on a core CRM. We built it to include branded portals, billing, contracts, messaging, and file sharing in one place. Clients log into a space that reflects your brand, while your team manages the full relationship from a central record.
Here’s what you can do with Assembly:
- Embed Notion: You can embed your existing Notion dashboards or databases directly inside an Assembly client portal, so clients still see the work you manage in Notion.
- Track client details and activity: Manage client records, communication history, and relationship data in a structured CRM that keeps everything organized in one place.
- Give clients a branded portal: Clients log into a space that reflects your brand to access contracts, invoices, files, and project updates without email back-and-forth.
- Keep tasks, messages, and files together: Client communication, shared files, and project tasks stay connected to each client record instead of being scattered across separate tools.
- Prep faster for meetings: The AI Assistant summarizes recent client activity and communication, helping you walk into calls with a clear picture of what’s been discussed and what’s outstanding.
- Protect client data: Assembly meets SOC 2 compliance standards with role-based permissions, encryption, and regular security audits. It also supports GDPR, CCPA, and HIPAA compliance.
- Cut down on admin: Automate repetitive jobs like reminders or status updates that used to take hours. The Assistant handles the busywork so your team can focus on clients.
Want to keep Notion for internal work while offering clients a branded portal? Start your free Assembly trial today.
Frequently asked questions
Do I need a paid plan?
Yes, you’ll need a Business or Enterprise plan if you want to restrict access at the individual database record level. You can build a client portal on lower tiers, but you’ll rely on careful page sharing and hierarchy instead of record-level controls.
Can I manage multiple clients?
Yes, you can manage multiple clients in Notion using a central database with relations and filtered views. Each client can have their own page with linked tasks and files. However, as your client list grows, maintaining filters and permissions requires more oversight.
Can Assembly work with Notion?
Yes, Assembly works alongside Notion by allowing you to embed Notion pages inside a branded client portal. You can continue managing internal work in Notion while using Assembly for client login, billing, contracts, messaging, and structured client records.
Your clients deserve better.
Try for free for 14 days, no credit card required.